

* 이 글은 인프런 강의 <[왕초보편] 앱 8개를 만들면서 배우는 안드로이드 코틀린>을 보고 정리한 글입니다.
4. activity_main.xml
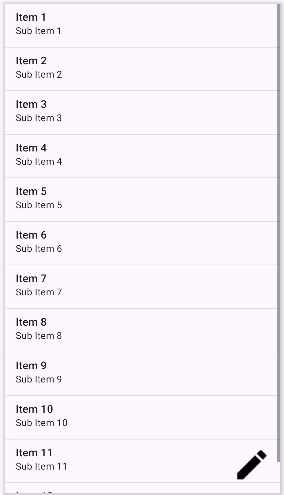
리스트뷰와 쓰기 아이콘을 위치시킨다.
<?xml version="1.0" encoding="utf-8"?>
<androidx.constraintlayout.widget.ConstraintLayout
    xmlns:android="http://schemas.android.com/apk/res/android"
    xmlns:app="http://schemas.android.com/apk/res-auto"
    xmlns:tools="http://schemas.android.com/tools"
    android:layout_width="match_parent"
    android:layout_height="match_parent"
    tools:context=".MainActivity">

    <ListView
        android:id="@+id/mainLV"
        android:layout_width="match_parent"
        android:layout_height="match_parent"/>

    <ImageView
        android:id="@+id/writeBtn"
        android:layout_width="wrap_content"
        android:layout_height="wrap_content"
        android:src="@drawable/icon"
        android:layout_margin="20dp"
        app:layout_constraintBottom_toBottomOf="parent"
        app:layout_constraintEnd_toEndOf="parent" />

</androidx.constraintlayout.widget.ConstraintLayout>
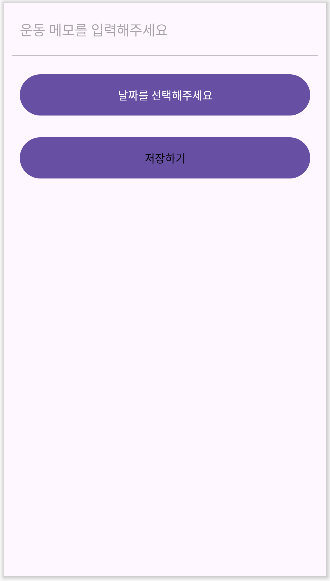
5. custom_dialog.xml
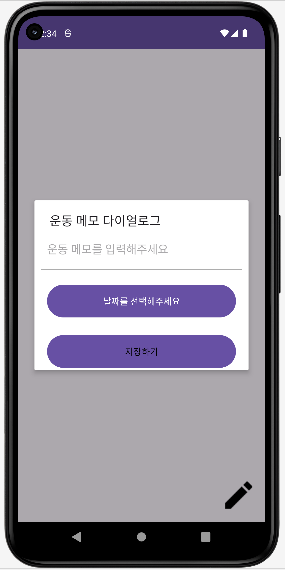
쓰기 아이콘을 눌렀을 때 나오는 다이얼로그 창을 만든다.
<?xml version="1.0" encoding="utf-8"?>
<LinearLayout
    xmlns:android="http://schemas.android.com/apk/res/android"
    android:layout_width="match_parent"
    android:layout_height="match_parent"
    android:orientation="vertical">

    <EditText
        android:id="@+id/healthMemo"
        android:hint="운동 메모를 입력해주세요"
        android:layout_margin="20dp"
        android:layout_width="match_parent"
        android:layout_height="wrap_content"
        android:background="@android:color/transparent"/>

    <LinearLayout
        android:background="#999999"
        android:layout_marginLeft="10dp"
        android:layout_marginRight="10dp"
        android:layout_width="match_parent"
        android:layout_height="0.5dp"/>

    <Button
        android:id="@+id/dateSelectBtn"
        android:text="날짜를 선택해주세요"
        android:layout_margin="20dp"
        android:layout_width="match_parent"
        android:layout_height="60dp"/>

    <Button
        android:id="@+id/saveBtn"
        android:text="저장하기"
        android:textColor="@color/black"
        android:layout_marginRight="20dp"
        android:layout_marginLeft="20dp"
        android:layout_width="match_parent"
        android:layout_height="60dp"/>

</LinearLayout>
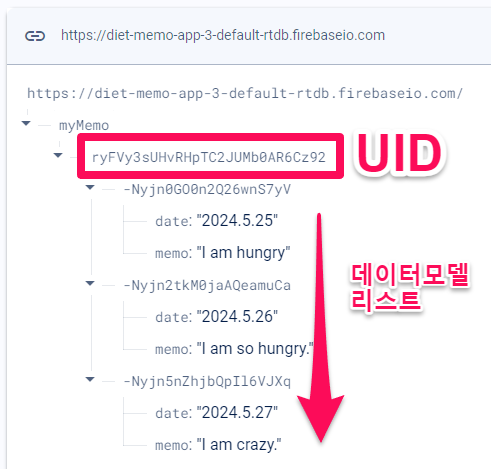
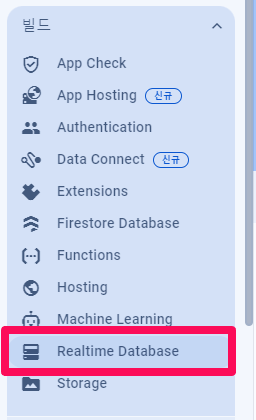
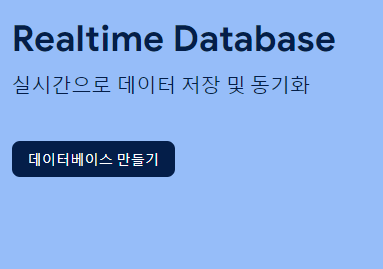
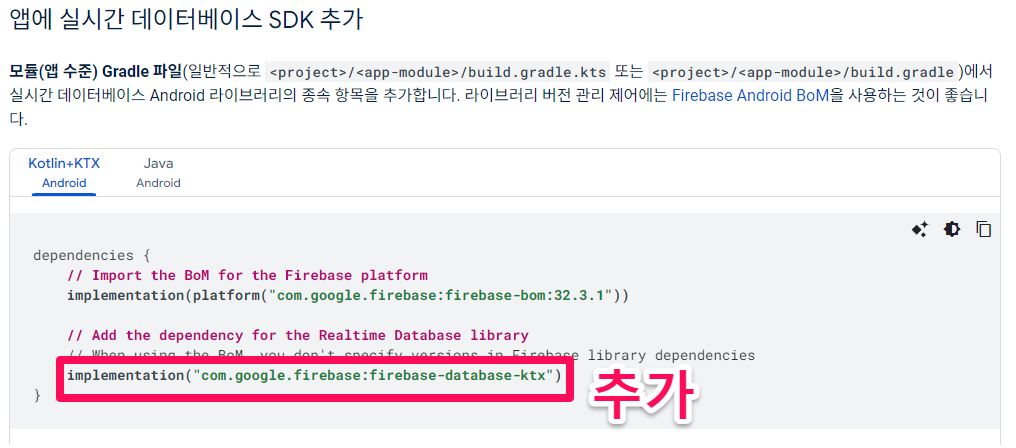
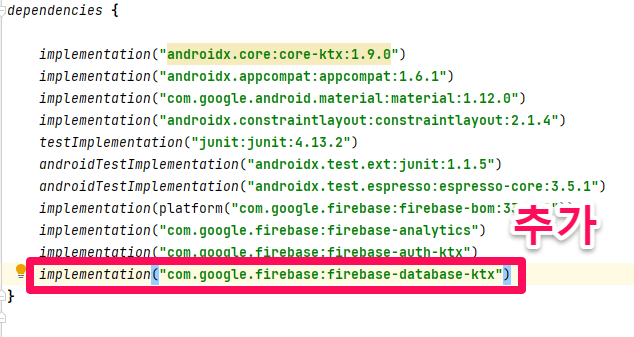
6. 파이어베이스 실시간 데이터베이스 사용
파이어베이스 프로젝트에서 실시간 데이터베이스(Realtime Database)를 클릭한다.
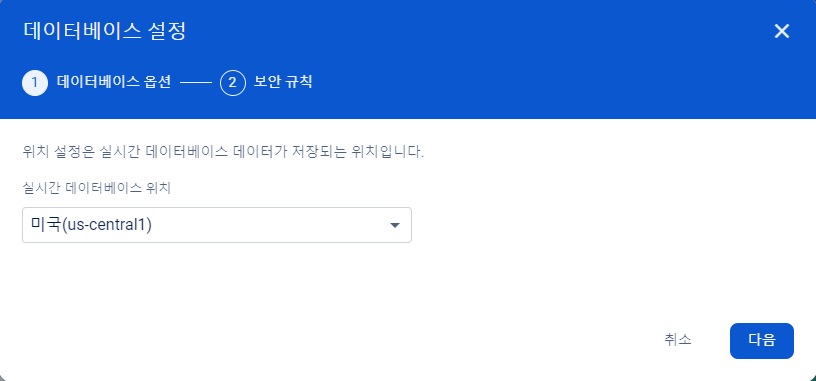
데이터베이스 만들기를 클릭
데이터베이스 위치는 미국으로 한다.
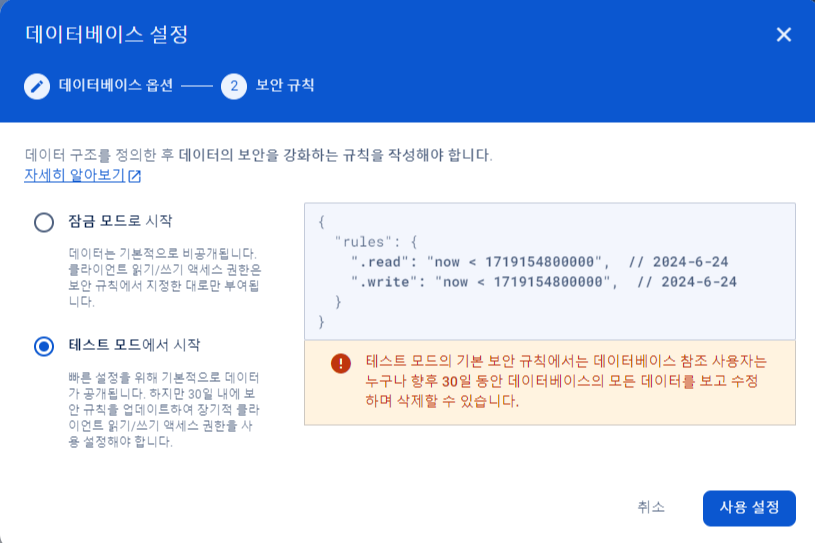
실습이므로 테스트 모드로 시작한다.
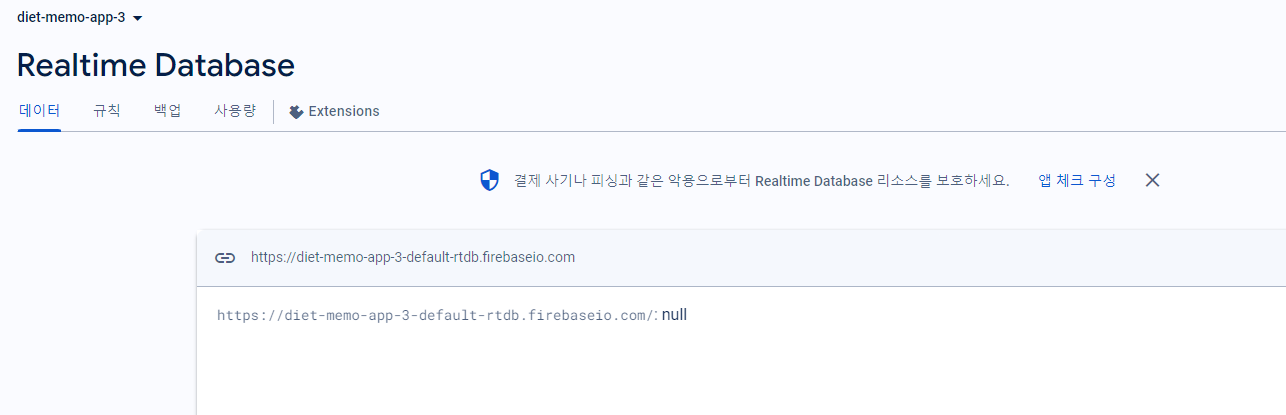
실시간 데이터베이스가 생성되었다.
파이어베이스 실시간 데이터베이스에 대한 공식 문서를 확인한다.
https://firebase.google.com/docs/database/android/start?hl=ko
Firebase에 앱 연결 | Firebase Realtime Database
Google I/O 2023에서 Firebase의 주요 소식을 확인하세요. 자세히 알아보기 의견 보내기 Firebase에 앱 연결 컬렉션을 사용해 정리하기 내 환경설정을 기준으로 콘텐츠를 저장하고 분류하세요. 아직 추가
firebase.google.com
실시간 데이터베이스 SDK를 앱 수준 Gradle 파일에 추가한다.
7. DataModel
날짜와 메모 데이터를 담을 데이터 클래스를 만들어준다.
data class DataModel (
    val date : String = "",
    val memo : String = ""
)
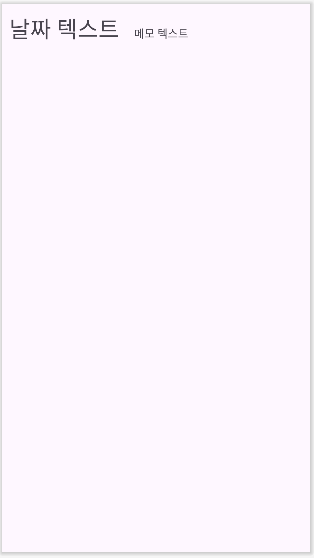
8. listview_item.xml
리스트뷰의 레이아웃을 설정한다.
<?xml version="1.0" encoding="utf-8"?>
<LinearLayout
xmlns:android="http://schemas.android.com/apk/res/android"
android:layout_width="match_parent"
android:layout_height="60dp">
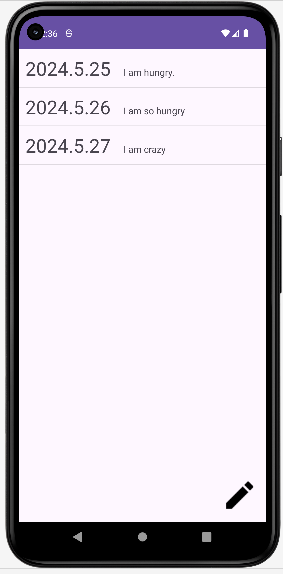
<TextView
android:id="@+id/listViewDateArea"
android:text="날짜 텍스트"
android:textSize="30sp"
android:layout_margin="10dp"
android:layout_width="wrap_content"
android:layout_height="wrap_content"/>
<TextView
android:id="@+id/listViewMemoArea"
android:text="메모 텍스트"
android:textSize="15sp"
android:layout_margin="10dp"
android:layout_width="wrap_content"
android:layout_height="wrap_content"/>
</LinearLayout>
9. ListViewAdapter
리스트뷰에 데이터를 전달하기 위해서 어댑터를 만든다.
class ListViewAdapter(val List : MutableList<DataModel>): BaseAdapter() {
    override fun getCount(): Int {
        return List.size
    }

    override fun getItem(position: Int): Any {
        return List[position]
    }

    override fun getItemId(position: Int): Long {
        return position.toLong()
    }

    override fun getView(position: Int, convertView: View?, parent: ViewGroup?): View {

        var convertView = convertView
        if(convertView == null) {
            convertView = LayoutInflater.from(parent?.context).inflate(R.layout.listview_item, parent, false)
        }

        val date = convertView?.findViewById<TextView>(R.id.listViewDateArea)
        val memo = convertView?.findViewById<TextView>(R.id.listViewMemoArea)

        date!!.text = List[position].date
        memo!!.text = List[position].memo

        return convertView!!
    }
}
* 리스트뷰와 어댑터 관련 글
안드로이드 리스트뷰(ListView)와 어댑터(Adapter)
* 이 글은 인프런 강의 을 보고 정리한 글입니다. 폰트 적용하기 자신이 원하는 폰트를 텍스트에 적용하자. 1. 폰트를 다운로드 한 후, 파일명의 대문자를 소문자로 변경한다. 2. 리소스 폴더에 fon
ds3qej.tistory.com
10. MainActivity
class MainActivity : AppCompatActivity() {
val dataModelList = mutableListOf<DataModel>() // 데이터 모델(날짜, 메모) 변수
override fun onCreate(savedInstanceState: Bundle?) {
super.onCreate(savedInstanceState)
setContentView(R.layout.activity_main)
// 파이어베이스 실시간 데이터베이스 사용
val database = Firebase.database
val myRef = database.getReference("myMemo")
// 리스트 뷰
val listView = findViewById<ListView>(R.id.mainLV) // 리스트 뷰
val adapter_list = ListViewAdapter(dataModelList) // 데이터 모델을 어댑터에 전달
listView.adapter = adapter_list // 어댑터 반환값 리스트 뷰와 연결
// 현재 유저의 데이터베이스에서 데이터 불러오기
myRef.child(Firebase.auth.currentUser!!.uid).addValueEventListener(object : ValueEventListener {
override fun onDataChange(snapshot: DataSnapshot) { // 데이터가 바뀔 때마다 이 함수가 실행됨
dataModelList.clear() // 데이터 모델 리스트 초기화
// 데이터 모델 리스트 작성
for (dataModel in snapshot.children) {
dataModelList.add(dataModel.getValue(DataModel::class.java)!!)
}
adapter_list.notifyDataSetChanged() // 어댑터 업데이트
}
override fun onCancelled(error: DatabaseError) {
}
})
// 데이터 생성
val writeButton = findViewById<ImageView>(R.id.writeBtn) // 쓰기 아이콘
// 쓰기 아이콘을 눌렀을 때
writeButton.setOnClickListener {
// 다이얼로그 창 생성
val mDialogView = LayoutInflater.from(this).inflate(R.layout.custom_dialog, null)
val mBuilder = AlertDialog.Builder(this)
.setView(mDialogView)
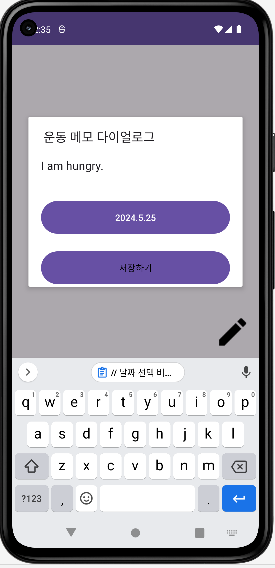
.setTitle("운동 메모 다이얼로그") // 다이얼로그 창 제목
val mAlertDialog = mBuilder.show() // 화면에 띄워진 다이얼로그 창
// 날짜 선택
val DateSelectBtn = mAlertDialog.findViewById<Button>(R.id.dateSelectBtn) // 날짜 선택 버튼
var dateText = "" // 날짜 변수
// 날짜 선택 버튼을 눌렀을 때
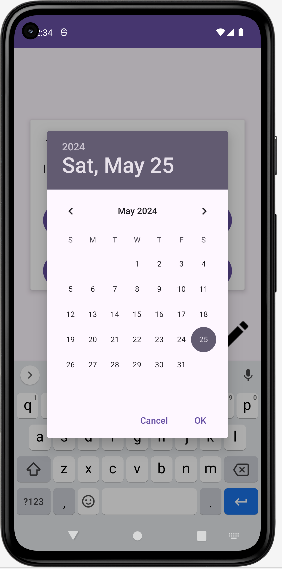
DateSelectBtn?.setOnClickListener {
val today = GregorianCalendar()
val year : Int = today.get(Calendar.YEAR)
val month : Int = today.get(Calendar.MONTH)
val date : Int = today.get(Calendar.DATE)
// 날짜 선택 다이얼로그 창 생성
val dlg = DatePickerDialog(this, object : DatePickerDialog.OnDateSetListener {
override fun onDateSet(view: DatePicker?, year: Int, month: Int, dayOfMonth: Int) {
DateSelectBtn.setText("${year}.${month + 1}.${dayOfMonth}") // 날짜 선택 버튼 텍스트 변경
dateText = "${year}.${month + 1}.${dayOfMonth}" // 날짜 변수
}
}, year, month, date)
dlg.show()
}
// 저장
val saveBtn = mAlertDialog.findViewById<Button>(R.id.saveBtn) // 저장 버튼
// 저장 버튼을 눌렀을 때
saveBtn?.setOnClickListener {
val healthMemo = mAlertDialog.findViewById<EditText>(R.id.healthMemo)?.text.toString() // 메모 내용
val model = DataModel(dateText, healthMemo) // 날짜와 메모를 담은 데이터 모델
// 파이어베이스 실시간 데이터베이스 사용
val database = Firebase.database
// 현재 유저의 데이터베이스에 저장
val myRef = database.getReference("myMemo").child(Firebase.auth.currentUser!!.uid)
// 데이터베이스에 데이터 모델이 추가 (저장)
myRef
.push()
.setValue(model)
mAlertDialog.dismiss() // 다이얼로그 창이 닫힘
}
}
}
}